Как провести отличное ретро?
В статье про ретро мы подробно обсудили, почему эта активность важна и полезна. Разобрали, что важно и какие мифы встречаются среди сомневающихся. И вот, когда мы определились, что проводить ретро надо, мы предлагаем это сделать в ПростоРетро! Это идеальное место для проведения отличных и интерактивных встреч. Команда будет точно довольна!
Начинаем
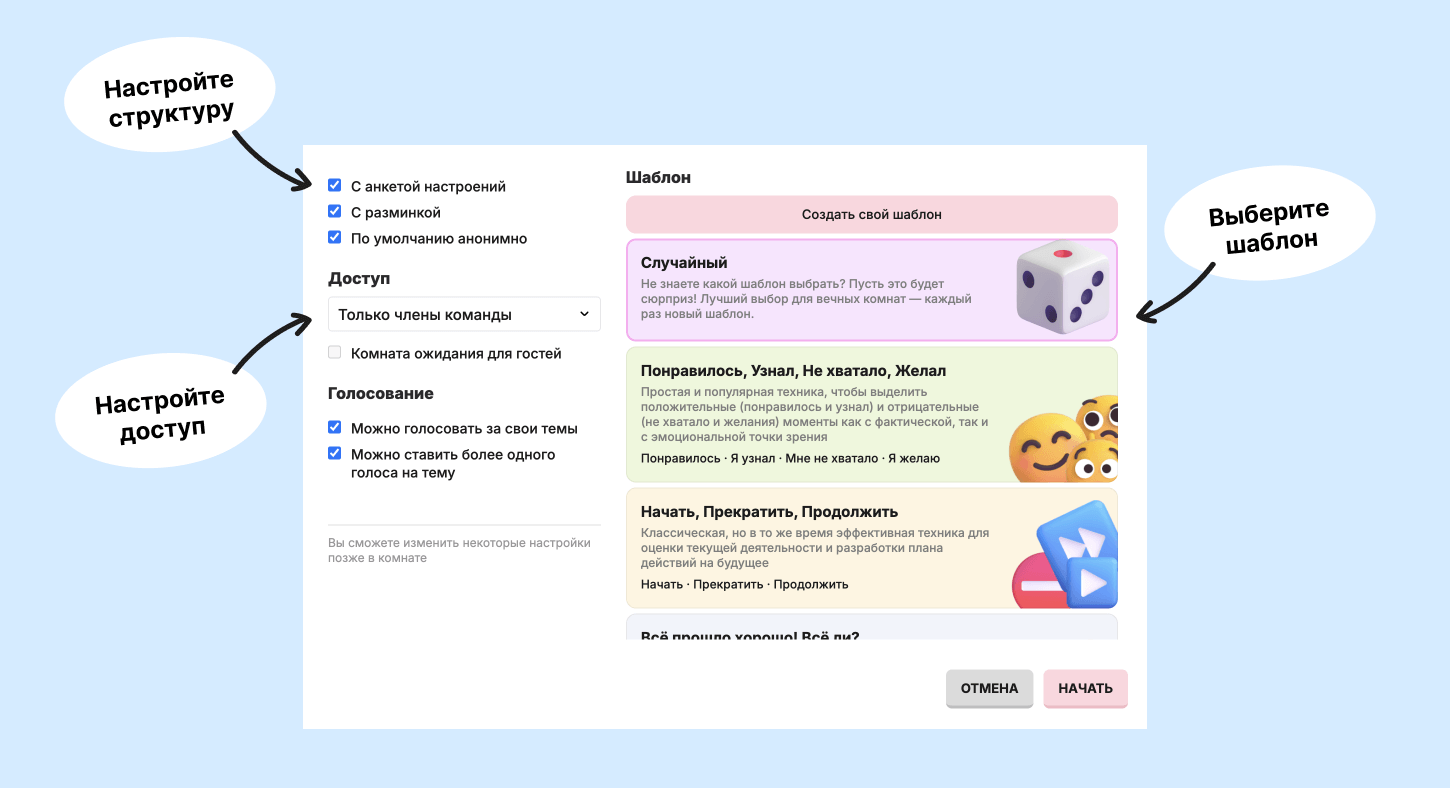
Новая ретроспектива начинается с экрана настроек. Скажем сразу: не хотите разбираться — справедливо — нажимайте сразу «Начать». Настройки по умолчанию уже достаточны, чтобы начать встречу в лучших традициях и практиках.
Но если вы проводите встречу уже не в первый раз, то, возможно, вам понадобится настроить доску под себя. Например, определиться, нужна ли вам разминка или анкета. Или настроить более строгий подход к тем, кто может присоединиться к встрече.
Кстати, не пренебрегайте чередованием шаблонов — по опыту мы знаем, что разнообразные шаблоны от встречи к встрече больше вовлекают участников. Ретро перестаёт быть рутиной, и вы получаете больше возможностей узнать свою команду с разных сторон.
Дорогой ведущий, таймер — ваш лучший друг! Не пренебрегайте им, пользуйтесь на каждом этапе. По нашему опыту, в основном недовольство от таких встреч обычно вызвано затянутыми обсуждениями.

Разминка
От 5 до 10 минут
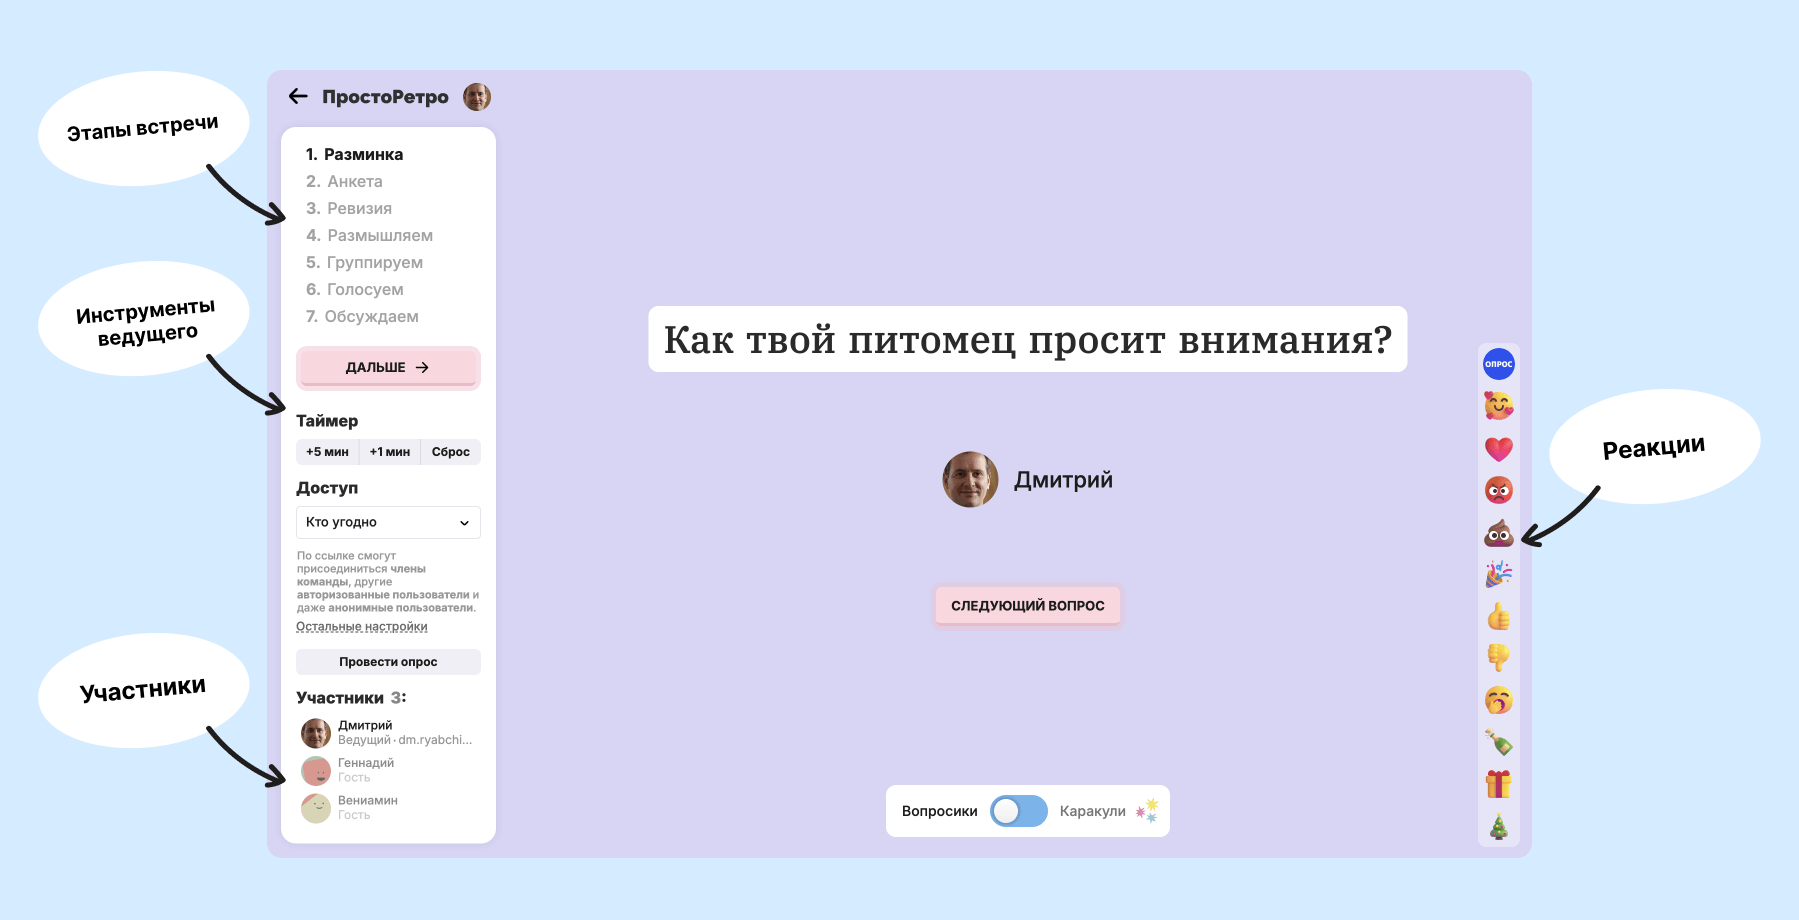
Предположим, мы решили остановиться на настройках по умолчанию, и вначале нас всех ожидает разминка. Но прежде чем мы обсудим, зачем она нужна, позвольте познакомить вас с базовым расположением основных частей доски.
Слева — панель, на которой мы видим этапы встречи, которые нас ожидают. Они удобно пронумерованы, и зачёркиваются те, что уже пройдены. Также на панели отображены все участники встречи с e-mail или другой важной подписью, чтобы видеть, кто этот человек на самом деле. В зависимости от этапа в подписях будет другая полезная информация, например, о готовности участника перейти на следующий этап.
Также, только для ведущего, на панели расположены кнопка переключения этапа, установки таймера и настройки доступа.
Но вернёмся к разминке.
Разминки — это не банальная попытка «развеселить» команду перед обсуждением серьёзных тем или место, где вы ждёте пока все присоединятся. Это важный инструмент, который помогает настроить участников на диалог и создать атмосферу доверия. Вопросы о хобби, предпочтениях или путешествиях раскрывают личные стороны коллег, укрепляют неформальные связи и помогают почувствовать себя частью единого коллектива. Узнав, что кто-то из команды тоже обожает горные походы или недавно прочитал вашу любимую книгу, вы начинаете видеть в коллегах не просто профессионалов, а людей, с которыми легче найти общий язык.
Для разминки достаточно выделить 5–10 минут. Не забудьте установить таймер! Это время позволяет настроиться на общение, не отвлекаясь слишком сильно от основной цели ретроспективы. Если команда большая (10+ человек), можно ограничиться несколькими случайными участниками, чтобы не затягивать встречу.
Спрашивать всех необязательно. Цель разминки — разрядить атмосферу и настроить команду на диалог, а не проверить каждого. Если команда маленькая, можно дать слово всем, но если команда большая, достаточно выборочного участия, чтобы сохранить динамику.
Некоторые участники могут чувствовать себя неловко или затрудняться с ответом. В этом случае ведущий должен обеспечить комфортную атмосферу. Например, можно предложить участнику передать ход другому, но обязательно спросите перед этим отвечающего — не против ли он. Важно напомнить, что ответы необязательны, и каждый может участвовать настолько, насколько ему комфортно.
Реагируйте на ответы участников с энтузиазмом и искренним интересом. Это создаст положительную атмосферу и подтолкнёт других к более активному участию. Если кто-то делится чем-то забавным или необычным, можно коротко пошутить или сделать комплимент — это сблизит участников и сделает разминку ярче. Главное — разминка должна быть лёгкой и непринуждённой. Она не должна вызывать стресса или превращаться в обязательную процедуру. Её задача — помочь команде настроиться на общение и укрепить чувство единства перед основным обсуждением.
Анкета
Около 1 минуты
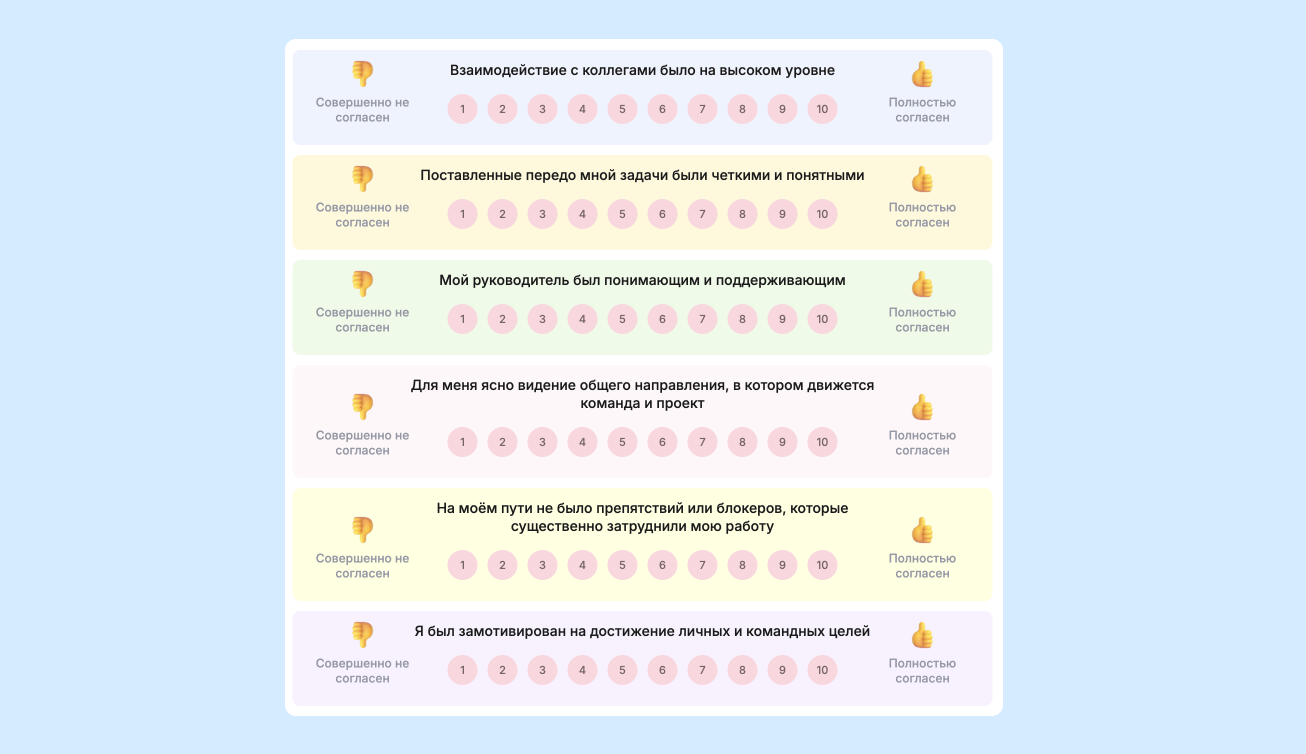
Анонимная анкета помогает команде и менеджеру получить более объективное представление о текущем состоянии процессов и атмосферы, минимизируя субъективность, которая может возникать в дискуссиях. Это очень мощный инструмент, который дополняет ретроспективу. Не игнорируйте его.
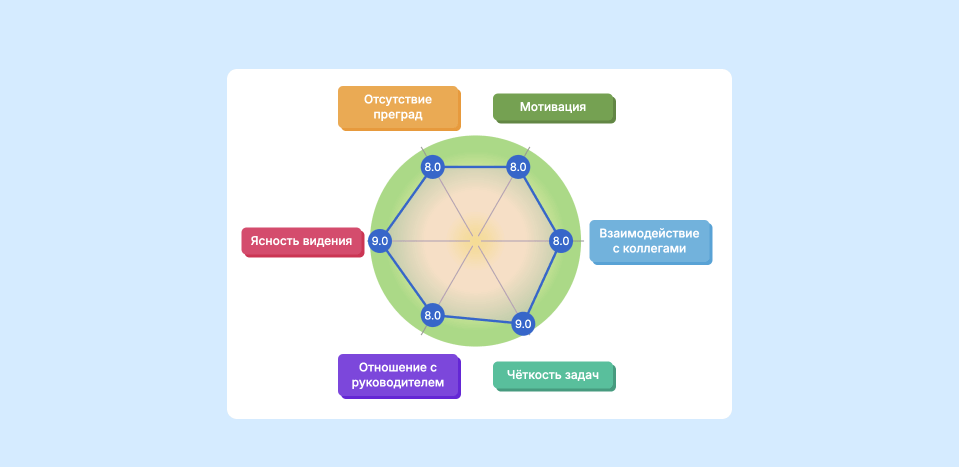
При регулярном заполнении анкеты сервис покажет график с динамикой, который позволяет не только оценить текущее состояние, но и отслеживать изменения во времени. Это даёт возможность увидеть влияние проведённых изменений, выявить долгосрочные тенденции и оперативно реагировать на ухудшение ключевых показателей. Например, снижение мотивации или рост числа препятствий может сигнализировать о системных проблемах, требующих немедленного решения. Благодаря таким метрикам команда может действовать на опережение.
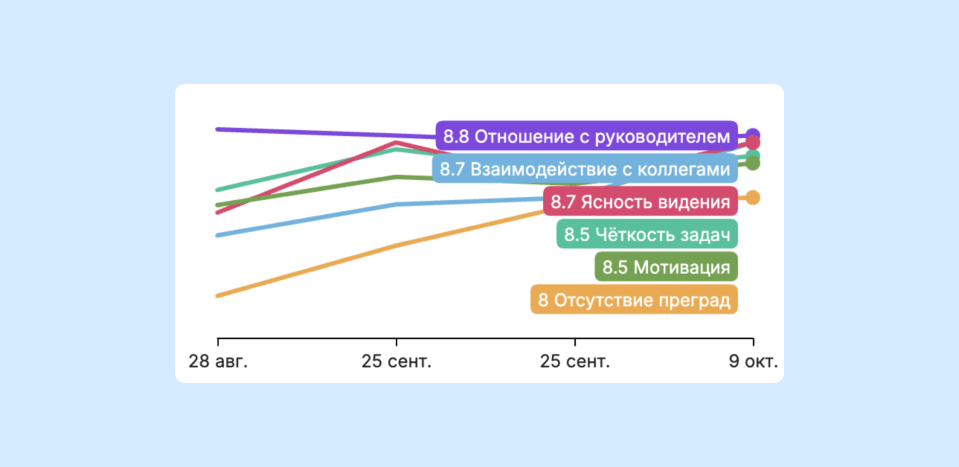
Следите за списком участников — там будет отображено, кто уже заполнил анкету, и когда можно переходить на следующий этап.
Заранее убедитесь, что участники понимают, что анкета анонимная и её результаты используются для улучшения работы команды. Это поможет избежать недоверия и повысит честность ответов. Напомните, что критика процессов — это нормально, а цель анкеты — выявить точки роста.
Обзор предыдущих действий
Около 3 минут
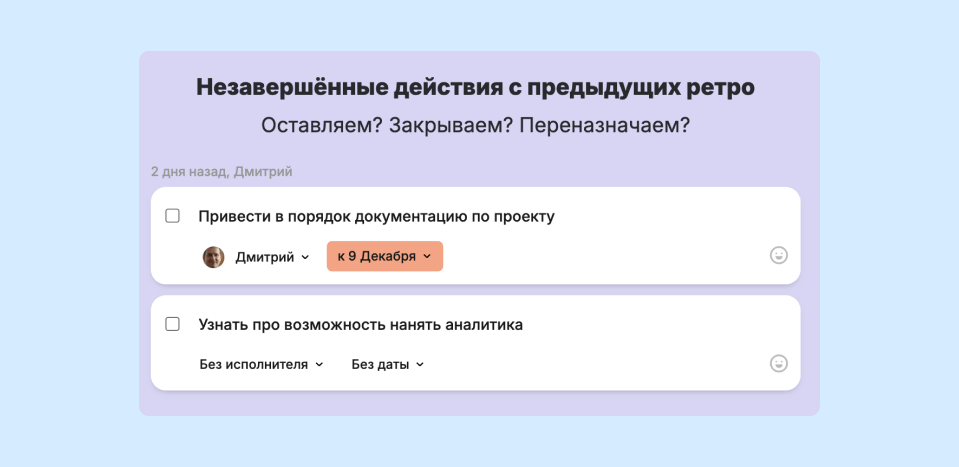
С прошлых встреч у вас наверняка остались пункты и действия, которые вы обязались выполнить. Понимаем, часто сами забываем про них. И мы поняли, что их ревизия должна быть частью встречи. На этом этапе действия можно актуализировать, перенести или назначить на других участников команды.
Размышляем
Около 10 минут
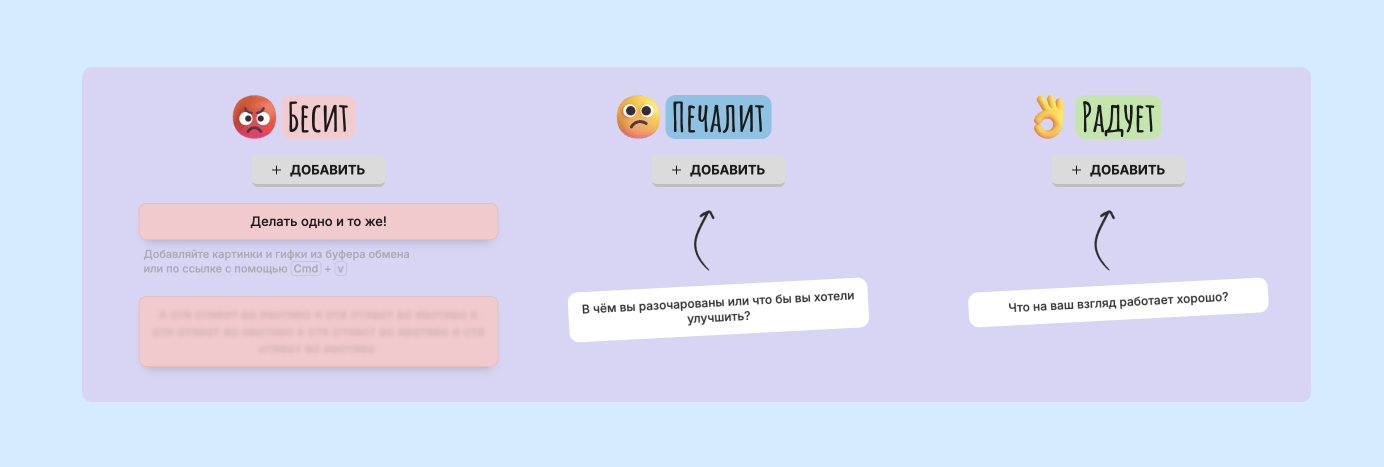
Самый главный этап — размышление. Именно тут участники, в полной анонимной безопасности, пишут свои мысли, рефлексируют над прошедшим спринтом, размышляют о процессах и предлагают решения. Участники не видят, что пишут другие — карточки ваших коллег вам не видны. Это способствует более полному размышлению. Сервис также предлагает лёгкий способ добавить в карточки гифки или картинки.
Ведущий во время этого этапа может голосом проговорить об основных достижениях, задачах и проблемах, с которыми столкнулась команда, чтобы напомнить коллегам и смотивировать их на написание. Напомните участникам, чтобы они не вносили все свои мысли в одну карточку, лучше — разбить на несколько, так как потом будет легче с ними работать. Также сообщите, что у участников есть возможность сделать карточку не анонимной, но ни в коем случае не требуйте этого, если хотите честного ретро!

Посвятите этому написанию достаточное время, например, 7–10 минут. И даже если видите, что активно писать закончили, то всё равно дайте ещё пару минут. Подчеркните важность честности и анонимности, чтобы участники не боялись высказываться.
Группировка
Около 3 минут

Группировка — очень весёлый этап! Во-первых, все карточки становятся открытыми, естественно, с учётом анонимности. Так как, скорее всего, будут встречаться похожие по смыслу карточки, их прямо сейчас можно сгруппировать. Просто перенесите одну карточку на другую — получится стопочка, которую можно будет раскрыть и озаглавить. Кстати, ИИ сразу поможет с заголовком.
Этот процесс командный — передайте участникам, чтобы не боялись сгруппировать что-то не то. Более того, абсолютно нормально группировать карточки из разных колонок — это даже полезно — рассмотреть проблему с разных сторон.
Голосование
Около 3 минут

Когда карточки сгруппированы (ок, если нет), переходим на следующий этап — голосование. У каждого участника есть несколько голосов, которые они могут отдать наиболее важной, по их мнению, теме. Это нужно, чтобы в первую очередь команда начала обсуждать то, что волнует всех. Это также важно менеджеру, так как он видит, что важно для команды. Это не значит, что остальные темы надо пропустить, просто приоритет всегда важен.
Количество голосов у участника рассчитывается автоматически и зависит от количества карточек на доске. Кстати, если ребята хотят отдать хоть все голоса за одну карточку, и даже если она своя — это нормально, всё равно общая оценка будет объективной. Хотя у вас и есть возможность в настройках выставить ограничения для голосования.
Обратите внимание на список участников — вы увидите, кто уже проголосовал, а кто ещё колеблется. Когда все проголосовали, переходите на заключительный этап.
Обсуждение
Около 20 минут
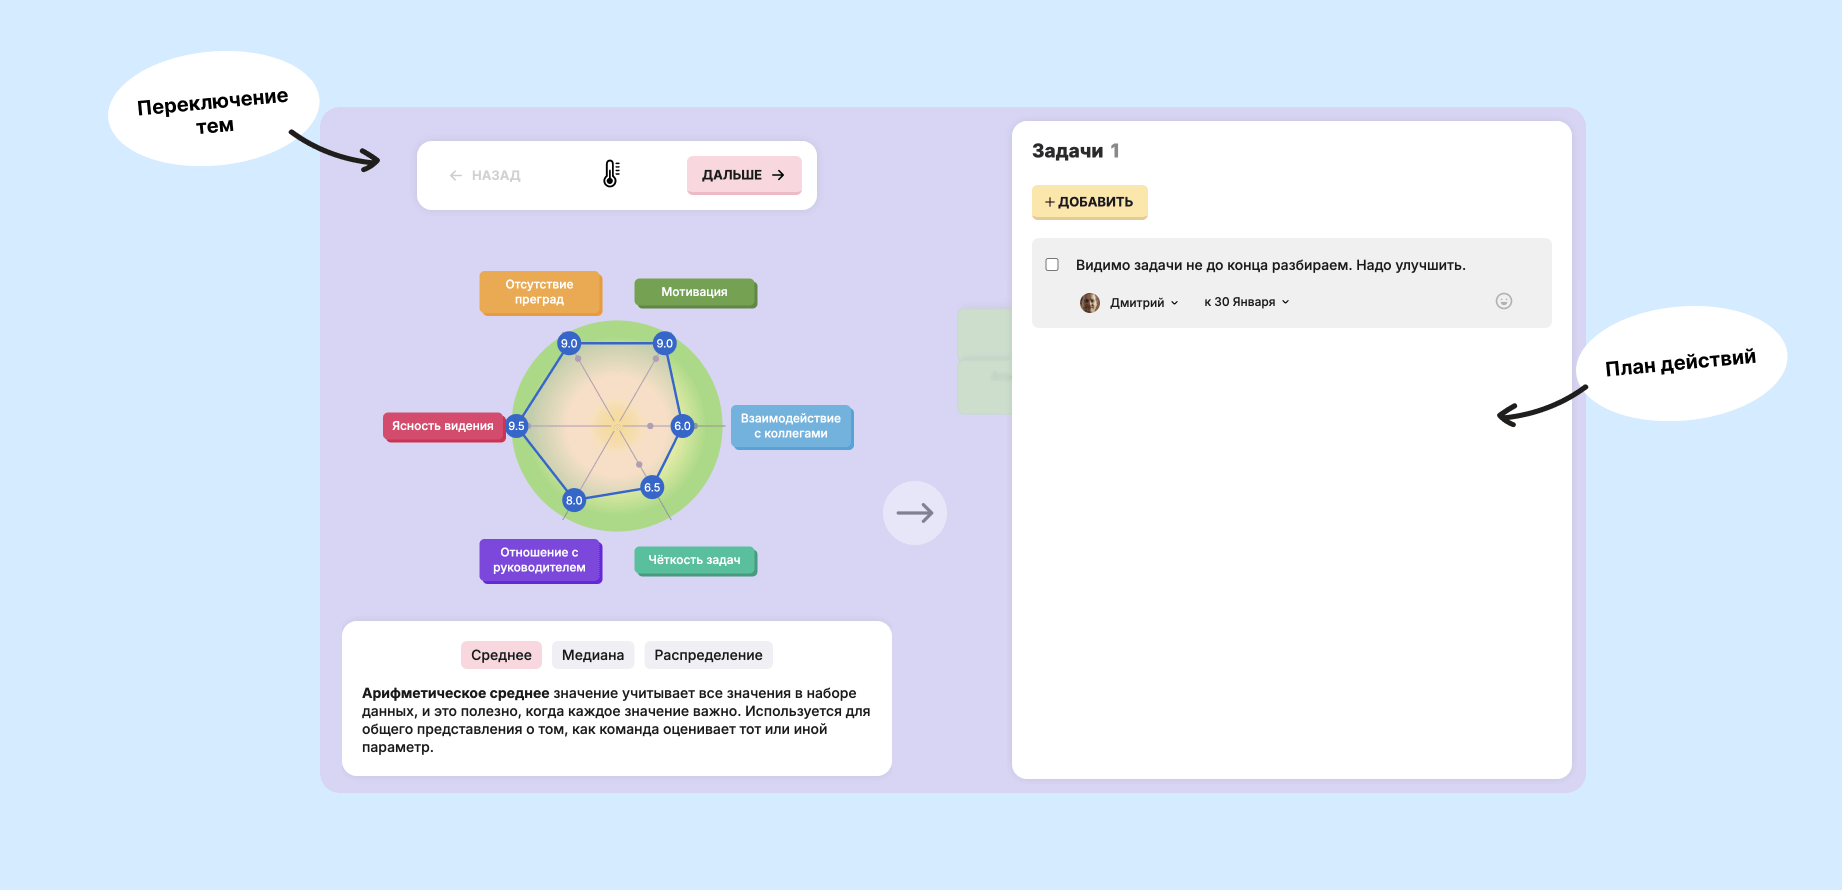
Вот теперь, когда мы собрали всю информацию и выделили самое важное, мы можем спокойно обсудить все темы. Сперва вы увидите результаты анкеты и динамику во времени. Ведущий проходится по каждому атрибуту и даёт простой комментарий. Не обязательно оправдываться, искать причину или решение проблемы, если оценка низкая. Достаточно озвучить голосом, чтобы команда услышала, что проблема не игнорируется и будет принята к сведению.
После обсуждения анкеты нажатием на стрелочку → переходите на первую и самую важную тему. Обычно здесь команда проводит больше всего времени, но не уделяйте ей более 5–6 минут, так как обязательно должно остаться время на остальные темы.
Для каждой темы мы рекомендуем ведущему следующий алгоритм:
- вслух озвучить все карточки
- если ведущий — это менеджер или руководитель команды, то высказать небольшой комментарий
- дать возможность участникам высказать дополнительно голосом, но ни в коем случае не спрашивать «чья эта карточка?», иначе эффективность этого и последующих ретро сильно снизится
- добавить в план действий запись — это не обязательно должно быть уже сформированное решение, достаточно суммаризировать проблему и записать её, а к её решению вы вернётесь позже
В конце встречи не забудьте нажать на кнопку «Завершить», чтобы сформировать отчёт о ретро, дать участникам оставить анонимный фидбек о встрече, а также получить письмо на почту с отчётом.
Что ещё?
Кнопка перехода на следующий этап в меру возможностей «умная»! Она будет подсказывать вам, когда можно переходить на следующий этап. Когда она полностью заполнилась, это означает, что все участники сделали то, что требовалось. Но всё же иногда стоит спросить у всех голосом или с помощью голосования.

Используйте анонимные опросы для сбора оперативного фидбека!
